What are Paint Sample Squares?
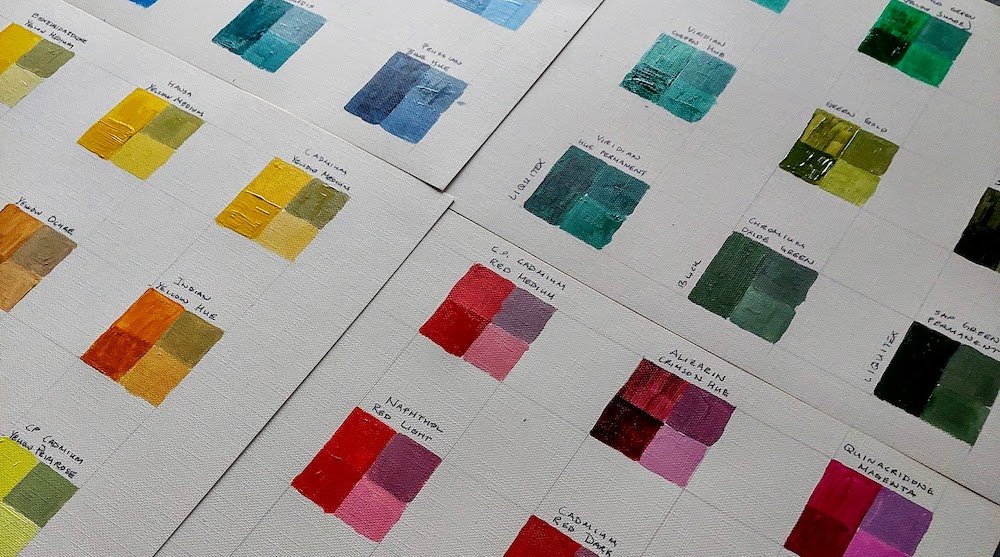
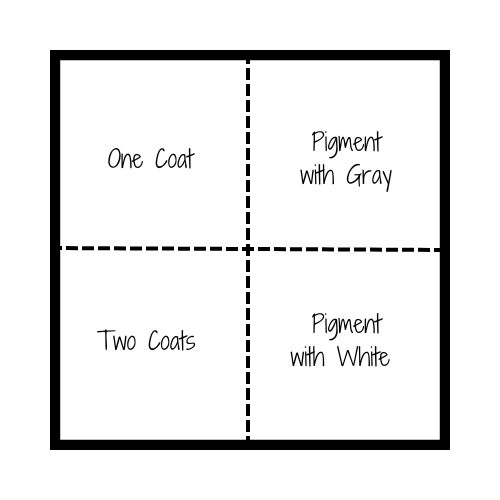
Paint sample squares are a way to tell how a certain pigment behaves at a glance. You can see the true color, how it looks with one coat or two, which helps understand that pigments transparency or opaque qualities. There are different versions of paint sample squares. Some have texture. Some only have one coat and then the pigment plus white. Today will be talking about paint sample squares that have four quadrants – allowing us to see one coat, two coats and how the pigment behaves with titanium white added, and also what happens when gray is added.

Why Use Paint Sample Squares?
Before we can know what paint color we need in our artwork, we need to understand how that color behaves. Two colors when pure may look like, but then be very different when titanium white is added. Knowing how our own paints behave is critical to a good painting experience. In the case of dark colors, it can be hard to know what they even are until we add white. Yes, we’re talking about you Dioxazine Purple.
How Do You Make Paint Sample Squares?
Now that we know what they are, and why we care, let’s go over some strategies and styles for making your own squares. This will work with any opaque medium (oil, acrylic, gouache, etc.).
First, you will need the following materials:
- Canvas Paper for your medium. I like the Canson products, but there are plenty of good options out there. Canvas paper comes in tablets, and is sturdy enough for paint, and will last. However, it is much thinner and cheaper than canvas, or canvas boards.
- Paint! Whatever you use. The whole point of this is to know your colors. Don’t go buy anything extra.
- Lots of small brushes
- Paper towels
- Brush washing area
- Palette. Disposable palettes are handy for this.
- Ruler and pencil
- A pen or pencil to write the name of the colors
Next, we will create our squares. Take out the canvas paper and pencil and ruler. I find that 2″ x 2″ squares work great. Any bigger and you simply have to spend more time and materials, and any smaller and you will need detail brushes to get it done. Create a grid of 2″ squares. A lot of this will be wasted area. If you want ot conserve paper, you could alternate 2″x 2″ with 1″ between them, but I just go for the simple 2×2.
Know your style. If you are a perfectionist, with a vision of perfect squares – go for it. I myself, tend to be close to exact with little sloppy bits. Your own style will show up in this exercise, even though they are little squares. Just embrace it. For some reason, we tend to fight against our style.
Now we have our canvas paper gridded and we are ready to create our first square.
Do Try This at Home 🙂
I recently made a lot of paint squares for an online class that I am filming. I found that making the squares takes some patience, but you get into the rhythm and it is enjoyable. Here are my tips for you after my experience:
- Keep your colors clean. Working with palette knives for mixing helps, but you may find it is one more step in the process. After a while, I just used small brushes. I would work on a few squares at time. And then clean my brushes for the next ones.
- Use a very small amount of paint. You aren’t covering much area. This will save your resources.
- Lay out the paint on your palette in the same order the squares on your paper. Some of those blobs of paint look A LOT like their friends. That is why we need to do this exercise after all.
- Watch a movie or two while you do it.
- Label your colors as you do this exercise. If at the end, you don’t know exactly which yellow or blue that paint sample is, then it won’t be helpful.
- Leave space between your squares. This makes it so colors can’t bump into eachother and pollute your results.
- Pre-mix your gray. Mix up a lot of it. I kept my in air-tight palette so that I could return to this activity, and keep going without the acrylic paint drying out.
- Paint the entire left side of the square first. When dry you can add a second coat to the bottom left of the square.
- A note about brands – if you are using only one brand of paint, you don’t need this tip. However, if you are using multiple brands you will need to make a note of which paint sample squares are which brands. There is a difference between brands. Here is a video I made about that: Video: Is a Color the Same Between Brands
- You don’t have to create a square for every tube you own. Start with the ones you use the most often. Or, work through similar colors (like all the blues).
When you are done, pat yourself on the back. Let them dry, and take a photo. Tag me on Instagram if you share your efforts. IG: @kristenoneillart Any questions or surprises? I’d love to hear your thoughts – so comment below!